Pages

Monday, December 31, 2012

Buttermilk Biscuits


The bacon, egg, and cheese biscuit was the favorite breakfast sandwich of McDonald's employees back in my day.  Yes friends, when I was young, I used to walk through blizzards in bare feet to work the 5AM to 1PM open shift at my local Mickey D's.  And though there are few things that I miss about it, I do have fond memories of sliding a tray of frozen biscuits into the oven.  When they came out of the oven, the three opening employees would brush the tops with butter, and then take a quick break to eat a biscuit before sliding them into the warming oven.

Anyway, in spite of or maybe because of my experiences as a fast food employee, I hardly ever eat fast food.  But every once in a while, I do take a few minutes to recreate the experience at home.

Ingredients
Yield: 4 - 5 biscuits
(Recipe from Fast Food Fix)

  • 1 cup & 1 tablespoon all purpose flour
  • 1 teaspoon baking powder
  • ½ teaspoon salt
  • ¼ teaspoon baking soda
  • 3 tablespoons cold butter
  • ½ cup buttermilk (or 2 tablespoons powdered buttermilk plus ½ cup water)

Method
Brew a strong cup of coffee and combine the dry ingredients.  Cut the butter into small pieces and drop into the flour mixture.  Use a pastry blender or two folks to mash the butter into the flour.

Add the buttermilk and lightly stir to combine.  And oh happy day when I learned that powdered buttermilk is just as good as real buttermilk for baking [insert powdered milk biscuits joke from Prairie Home Companion here].

The finished product will look like this and is very sticky to the touch.

Flour up a cutting board and place the dough on top.

Flour up your hands and give it a few kneads.

Shape it into a 6" x 6" square.  Get a 3" biscuit cutter (otherwise known in my house as a drinking glass).

Cut out two biscuits.

Reshape the dough into a 3" x 6" square and cut out again.  Reshape the scraps into the final biscuit.  You'll get 4-5 biscuits out of the batch.

Now let's think this through for a minute.  Biscuits are only good when they're freshly baked.  I work out a lot, but not enough to burn through a batch of 4 biscuits in one sitting.  So how does this all work?  Well, once again, the freezer comes to the rescue!  Wrap any unbaked biscuits that you don't want to eat right now in plastic wrap and freeze them.

Bake the remaining biscuit at 425° for about 8 minutes until golden brown on top (the official baking time for the full batch is 15 minutes.)

Now I'm sure that I signed a confidentiality agreement with McDonald's at some point, and I wouldn't want to violate their trust by revealing the ingredients used in bacon, egg, and cheese biscuits.  (Real McDonald's employees will notice that the quantities have been altered to suit personal taste).  And if McDonald's was doing the cooking, they would cook the eggs in a special mold to get the square shape.  I just act like I'm making an omelet and fold the sides in to get a square.

When you're ready to bake up the frozen biscuits, just place them right on a baking sheet and bake as though the dough was fresh.  It only takes an extra minute or so to bake from frozen dough.  From personal experience, I can tell you that they will last a month in the freezer just fine, but one year is too long.

Where the cutoff between those two points is, no one knows for sure.

Sunday, October 21, 2012

Poached Frozen Chicken Breast & Chicken Salad

I like chicken, I do, but I have bad memories of being served tough, stringy platefuls of it as a child.  So all of my cooking methods involve tenderizing it as shown here and here.  But finding the time to cook remains a problem.  I'd be embarrassed to tell you how many times I've bought fresh chicken from the store only to throw it away a week later when I still haven't gotten around to cooking it.  Safe to say that now I only buy frozen chicken, which takes a long time to thaw.  Recently I heard about poaching as a fast cooking method, but all of the recipes I saw were specifically for fresh chicken.  The question was if frozen chicken could be poached, and if so, would it be any good?  The answer was a resounding yes, with tender, juicy chicken straight from freezer to mouth in 30 minutes.


Ingredients
  • For poached chicken:
    • 8 oz frozen chicken breast
    • vegetable or chicken broth
    • white wine
  • For chicken salad:
    • ½ cup fresh herbs, such as dill, tarragon, and basil
    • salt, pepper, and garlic powder to taste
    • 2 tablespoons mayonnaise
    • 2 tablespoons sour cream
    • 8-inch tortillas for serving
Method
The journey begins with the retrieval of a frozen chicken breast from the Birchwood freezer.

Yes, I have big breasts.  I should, I mean I paid for them and everything!  This particular monster was a full 8 ounces.

Portion out enough water to cover the chicken breast in a covered pan.  This will vary anywhere between 2-8 cups depending on the size and depth of the chicken and the pan you're cooking it in.  Add enough broth to make half strength bouillon.  Wonder how I know that it only has to be half strength?  Because the first time I made this, I was running low on bouillon, that's how.

Submerge the chicken in the broth.  Don't be shy about adding more water/bouillon to cover the breast.

Add in a generous glug of white wine, cover the pan, and turn the heat on to high.  And then my favorite part of the recipe, leave the kitchen until the liquid boils.

Let it boil for about a minute and turn off the heat.  Leave it covered and go away for about 20 minutes.

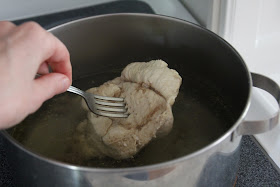
Retrieve the now poached chicken from the pan.  

Take a quick slice into it to check for doneness.  If you see anything pink, drop it back into the pan and ignore it for a few more minutes while it finishes cooking.  Pick over the chicken for anything that you wouldn't normally eat, like the fatty pieces and veiney things that you normally pick off before cooking thawed chicken.

 The remaining liquid is bona fide chicken stock, which you can save to make chicken soup or whatever it is people do with stock.  Or just discard it.

Now of course, there are many things you can do with the poached chicken, but on this particular day I was craving chicken salad.  So I chopped it.

Oh celery, you are good for nothing but adding crunch to chicken salad.  IMHO, the ideal celery-to-chicken portion is 1 stalk to 4 ounces.

Chop up a selection of fresh garden herbs.  I used basil, tarragon, and dill.

Mix in enough white stuff to hold it together.  Mayo is always a good choice, but I also like to thin it out with reduced fat sour cream to lighten things up a little.  Season with salt, pepper, and garlic powder.

Portion the salad into a tortilla and wrap it up.

Toast it in a skillet on all sides for a few minutes.

And you know where to take it from here!


Friday, July 27, 2012

Penne with Zucchini and Mint

 
The drought has been hard on the garden this year.  I was sure that my zucchini plant was done and didn't check on it for a few days.  Which was long enough for this to happen...


Look at that monster!  Time to break out the zucchini recipes.  And this one not only uses up a ton of zucchini, but also uses up another garden pest, mint.  And oh yes, it goes from garden to plate in a scant 20 minutes.


Ingredients
Yield: 5 servings
(Adapted from Ellie Krieger)
  • 12 ounces penne pasta
  • ¼ cup olive oil
  • 4 cloves garlic, minced
  • 1 lb zucchini
  • 2 tablespoons lemon juice
  • 1 teaspoon lemon zest
  • salt and pepper to taste
  • ½ cup Parmesan
  • ¼ cup fresh mint leaves
Method

The journey began with a shopping trip...to my backyard.

Start cooking the pasta and slice n' dice the zucchini and garlic.

Saute the garlic in the olive oil for a few minutes.  Get it just short of brown.

Add the zucchini.  Cook on medium.  Cover and cook for 8-10 minutes until soft, stirring occasionally.

Zest the lemon.

Juice the lemon.

Chop the mint.

Turn off the heat and season with salt and pepper.  Add the lemon zest and juice.

Stir in the cooked pasta.

Add the mint & parm.  Stir everything together.


Thursday, July 12, 2012

Penne alla Vodka

I was well into my 30's before I ever heard of "penne alla vodka".  I didn't know what it was and I didn't care.  I just knew that I had to find some immediately.  So I did, and the world became a better place.
Recently I was saddened to learn that two acquaintances of mine have never heard of penne alla vodka either, which is a shame.  Clearly those of us who know what it is need to do more to get the word out.  So here is my effort to promote this simplest, cheapest, easiest, quickest, tastiest, and most elegant little gem.


Ingredients
(Recipe adapted from Jeanne Lemlin's Vegetarian Classics)
Yield: 8 servings
  • 1 lb penne pasta
  • 1 tablespoon olive oil
  • 1 garlic clove, minced
  • Red pepper flakes to taste
  • 28oz can crushed tomatoes
  • ½ cup vodka
  • 1 teaspoon salt
  • 1 cup heavy cream
  • Parmesan cheese
  • Fresh parsley and basil 
Method

Add pasta to boiling water and let steep for 10 minutes.

Rinse and dry the herbs.

The biggest change I made to the recipe was to dial the garlic way down.  The original would have 8 cloves for the quantity that I'm making.  But there's something about the chemistry of the vodka and cream that really, really, seriously enhances the garlic smell in the final dish.  To the extent that your entire home will retain the smell for a week.  And if you bring the leftovers in for lunch, the entire organization will comment on it.

Saute the garlic and the red pepper in the oil for just a minute on medium heat.


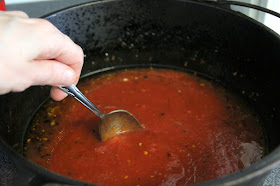
Add in the tomatoes, salt, and vodka.  Let simmer for 10 minutes, which will thicken and heat the sauce, and yes, cook the alcohol out.  But since no other big cooking tasks are required for the next 10 minutes, no one is saying that you can't sample the vodka while the bottle is out.

Once your drink is ready, check on the pasta.

Drain it.

Slice the herbs into a chiffonade.

After 10 minutes, the sauce looks a little angry.

Soothe it by turning off the heat and adding the cream.

Spoon the sauce over the pasta.

Garnish with cheese and herbs.